

Seasons
In the Seasons tab you define season periods for your resources. Seasons are the recommended method for regularly recurring bookings, as they can easily be copied to the following year.

Prerequisite: Check holidays
Section titled “Prerequisite: Check holidays”Before creating a season, check in the Holidays tab that all breaks and holidays are correctly activated. Everything marked as a closure there will automatically be excluded from bookable periods in season bookings.
Creating a season
Section titled “Creating a season”Use the + Add button to create a new season:
- Enter a title (e.g. “Summer season 2025” or “Full-year season 2025”).
- Define the time periods—either manually or automatically.
- Select the resources the season applies to.
- Save the season.
Automatically generating time periods
Section titled “Automatically generating time periods”Locaboo can automatically calculate bookable periods based on your activated holidays and breaks:
- Select the relevant year (e.g. 2025).
- Click Add time periods.
- Locaboo creates only periods where no holidays or breaks occur.
Example: If 6 January (Epiphany) is activated as a holiday, Locaboo creates a period from 1 Jan to 5 Jan and another starting from 7 Jan—the holiday is automatically excluded.
Adjusting time periods
Section titled “Adjusting time periods”You can individually adjust the generated periods:
- Remove unneeded periods—e.g. if your summer season starts in June, delete the periods from January to May.
- Change start and end dates—click a period to adjust the dates.
Season bookings in the calendar
Section titled “Season bookings in the calendar”When you create a new booking in the calendar, you can choose Season as the booking mode. Then select the desired season.
Locaboo checks all individual instances of the season for conflicts. After saving, the booking receives its own ID and is permanently anchored in the calendar.
Back in the Seasons tab, you can identify seasons with active bookings by an exclamation mark icon and a note that the season has events.
Copying a season to the following year
Section titled “Copying a season to the following year”The biggest advantage of seasons over recurring bookings: all bookings of a season can be transferred to the following year with a single click.
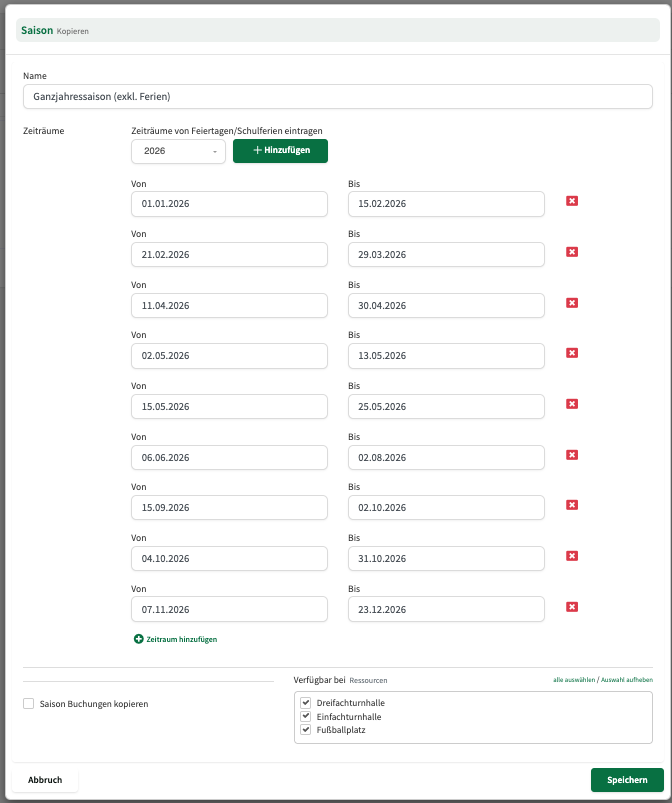
How to copy a season
Section titled “How to copy a season”- Open the existing season and click Copy.
- Adjust the title (e.g. “Full-year season 2026”).
- Remove the old time periods and add the new periods for the following year.
- Click Copy recurring bookings—a list of all bookings from the original season appears.
- Transfer all bookings with a single click.
- Save the new season.
Seasons vs. recurring bookings
Section titled “Seasons vs. recurring bookings”Seasons have several advantages over regular recurring bookings:
| Criterion | Season booking | Recurring booking |
|---|---|---|
| Start/end date | Automatically from the season definition | Must be set manually |
| Copy to following year | Yes, with a single click | No, each booking must be extended individually |
| Holidays/breaks | Automatically excluded | Must be checked manually |
| Performance | Optimised | Can slow down conflict checking over long periods |
Editing individual booking instances
Section titled “Editing individual booking instances”Within a season booking you can adjust individual dates without changing the entire series. Open the booking in the booking sidebar and go to the List of all bookings tab:
- Pencil icon: Change resource, date, or time for this single occurrence.
- Cancellation icon: Cancel only this one occurrence. Optionally you can notify the customer about the cancellation.
Ending an entire season series
Section titled “Ending an entire season series”An active season booking cannot be cancelled completely with a single click. Instead you have two options:
- Remove future occurrences individually: In the calendar list view, select multiple booking instances with the checkboxes and delete them in bulk. Deleting removes the bookings but does not create a cancellation invoice.
- Delete the entire booking series: Via the conflict manager or the list view, choose Delete entire recurring booking—this removes all instances (including past ones).
What happens when you copy a season?
Section titled “What happens when you copy a season?”The following data is transferred when copying:
| Copied | Not copied |
|---|---|
| Booking times (weekday, time, duration) | Individual adjustments to single instances (e.g. moved dates) |
| Customer and customer group | Invoices |
| Resource assignment | Booking status (all copies start as Draft) |
| Booking title |
The copied season is always created in Planning status. All associated bookings initially have Draft status and only become visible on the platform after release.
Typical yearly workflow with seasons
Section titled “Typical yearly workflow with seasons”A recommended workflow for annual season planning:
- Update the holiday calendar—Under Resources > [Resource] > Holidays, check that all breaks and holidays for the coming year are activated.
- Copy the existing season—Use the copy function to carry the season structure and bookings into the following year.
- Generate new periods—Remove the old periods and have the new ones generated automatically.
- Review bookings—Go through the copied bookings in the calendar. Remove bookings you no longer need and adjust times or resources as required.
- Release the season—Change the season status from Planning to Active. All bookings then move from Draft to Confirmed and become visible on the platform.