

Calendar view
You can open the calendar via Calendar in the left navigation or directly at app.locaboo.com/dashboard/calendar. It shows all bookings for your resources at a glance. The view you last used is restored automatically the next time you open it.
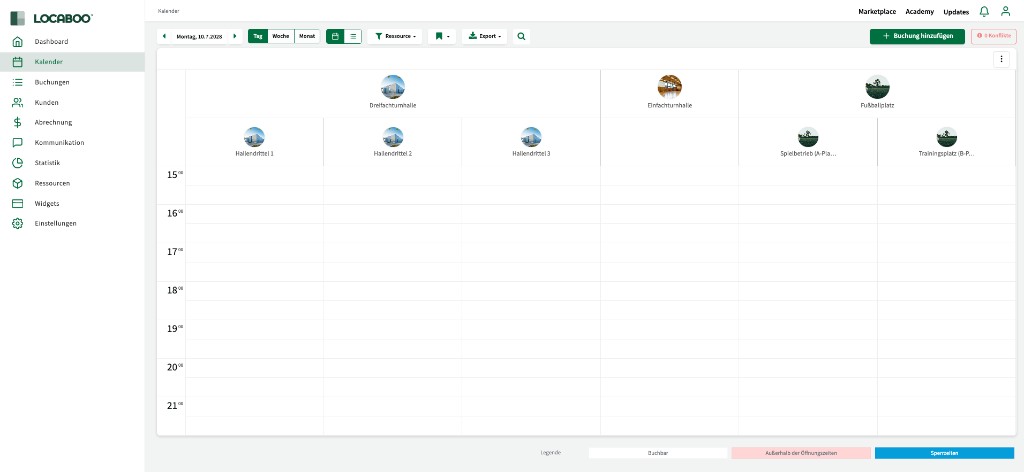
The navigation bar at the top contains all controls: date navigation, view switching, resource filters, favourites, export, search, and the button for creating new bookings.
Date navigation
Section titled “Date navigation”Use the arrows to the left and right of the date to move forward and backward by day, week, or month. Clicking the date opens a calendar so you can jump straight to a specific day, week, or month.
Calendar views
Section titled “Calendar views”Use the Day, Week, and Month buttons in the navigation bar to switch between three views:
| View | Description |
|---|---|
| Day | Shows all bookings for one day. Rows correspond to the times within the defined opening hours. |
| Week | Shows a full week. With a single resource you see the hourly grid; with several resources you get a more compact comparison view. |
| Month | Shows the full month for a resource. Bookings appear as coloured blocks on the respective days. |
Calendar and list view
Section titled “Calendar and list view”Besides the classic calendar view, you can switch between Calendar and List using the two icons:
- Calendar view – the familiar display with a time grid and resource columns.
- List view – all bookings for the selected period listed one below the other. In this view you can search specifically by booking title or by a particular customer. Using the status filter you can also show deleted bookings and restore them if needed—either individual instances or an entire recurring booking. You can also select several bookings at once and delete them in bulk.
Resource and category selection
Section titled “Resource and category selection”Use the Resource filter button in the navigation bar to choose which resources are shown in the calendar. You can select individual resources or filter by category—the categories you have created and assigned to your resources.
The fewer resources you select, the clearer the display. With multiple resources they appear as columns side by side—each with an image and name.
Filter presets (favourites)
Section titled “Filter presets (favourites)”If you often use the same combination of view and resources, you can save it as a filter preset. Click the save icon in the navigation bar and enter a name.
The following are saved:
- the selected view (Day, Week, Month)
- the chosen resources
- the calendar view settings (row height, cancelled/draft bookings)
Each user manages their own favourites. One click on a saved favourite restores the view immediately.
Export
Section titled “Export”Use the Export button in the navigation bar to export the calendar in various formats:
| Format | Description |
|---|---|
| Excel | All bookings in the current view as an Excel file. |
| The current view in DIN A4 format for printing. | |
| The current view as a PDF file for download. | |
| iCalendar | Export as an iCal file for subscribing in other calendars (e.g. Outlook). Synchronisation to your calendar via the iCal file is not real time and may take a while. |
Search
Section titled “Search”Click the magnifying glass icon in the navigation bar to open search. You have two search modes:
- Search for available times – Find available time slots using criteria such as time, duration, inventory, or services.
- Search for bookings – Find existing bookings by resource, category, inventory, or other criteria.
Add booking
Section titled “Add booking”Use the green + Add booking button in the navigation bar to open the booking sidebar. Alternatively, click a free time slot in the calendar—a small plus icon appears and the booking sidebar opens on the right.
If a resource is closed due to a block period (e.g. holidays), clicking in the calendar shows a corresponding message. As a user or manager you can still create a booking during the block period using + Add booking.
For more details, see Booking sidebar.
Conflicts
Section titled “Conflicts”The Conflicts button at the top right of the navigation bar shows how many conflicts there are in the current view.
Conflicts occur when:
- at least two bookings overlap in time (booking overlap)
- a booking falls outside opening hours or in a block period (holiday / block period)
- a customer is not allowed to have a booking in the resource according to the Availability settings
Bookings with conflicts are shown in the calendar with reduced opacity and a red bar. In month view, affected days are highlighted in red.
Conflict manager in the calendar
Section titled “Conflict manager in the calendar”Click the Conflicts button in the navigation bar to open the conflict manager. You can also reach it from the dashboard.
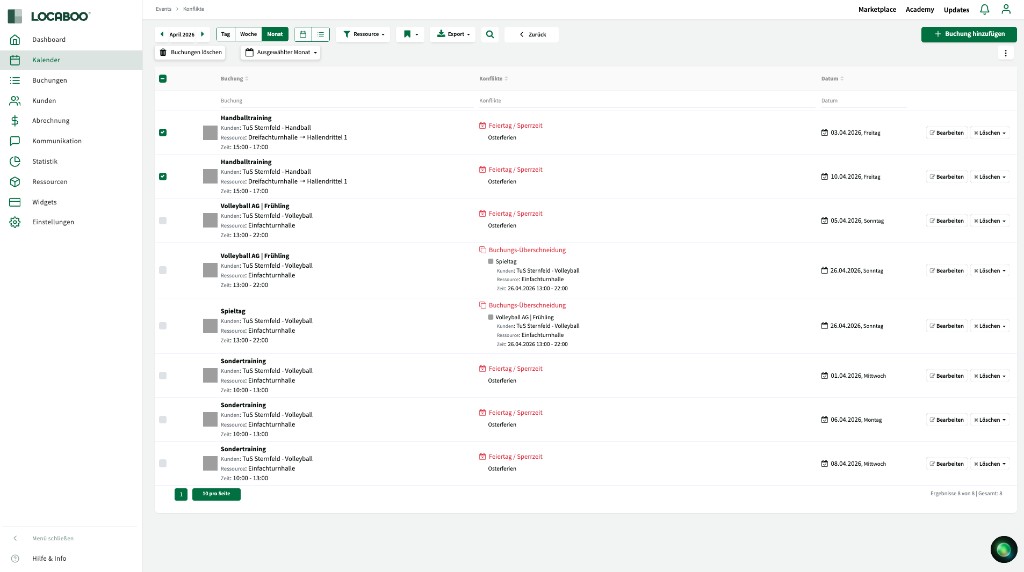
The conflict manager lists all bookings that have conflicts. Each row has three columns:
| Column | Content |
|---|---|
| Booking | Title, customer, resource, and time of the affected booking. |
| Conflicts | Type of conflict—e.g. Holiday / block period (with details such as “Easter holidays”) or Booking overlap (with details of the overlapping booking). |
| Date | The date of the affected booking instance. |
Use the Selected month dropdown to filter conflicts by period. You can also use the resource filter to select specific resources.
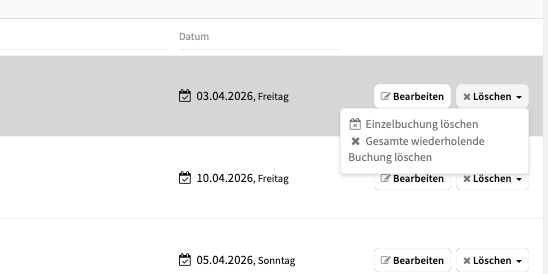
For each booking you have two actions:
- Edit – returns to the calendar where you can adjust the booking directly.
- Delete – opens a dropdown with two options:
- Delete single booking – deletes only this one booking instance.
- Delete entire recurring booking – deletes the full recurring booking with all instances.
When deleting, you can notify the affected customer about the cancellation. If you do not send a notification, the booking is deleted without informing the customer.
Use the checkboxes on the left to select several bookings and remove them in bulk with the Delete bookings button.
Calendar view settings
Section titled “Calendar view settings”Open the calendar view settings via the three-dot menu (⋮) at the top right of the calendar.
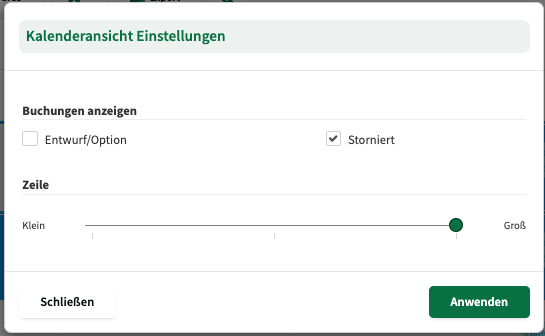
There you can set:
- Show bookings – the Draft/option and Cancelled checkboxes control whether bookings with these statuses are visible in the calendar.
- Row – use the slider to adjust row height in the calendar (from Small to Large).
These settings are saved together with your filter presets.
Color coding of bookings
Section titled “Color coding of bookings”Bookings in the calendar are colour-coded. A booking’s colour can come from several sources:
| Source | Description |
|---|---|
| Customer group colour | By default each booking uses the colour of the customer’s customer group. This colour is defined per group under Customers > Customer groups. |
| Manual booking colour | In the booking sidebar under General, the colour of an individual booking can be overridden manually. |
| Resource colour | Depending on the calendar view and configuration, the resource’s colour may also be shown. |
The calendar also indicates special booking statuses visually:
| Status | Display |
|---|---|
| Confirmed | Full opacity in the customer group or manual colour |
| Draft/option | Reduced opacity (semi-transparent)—only visible when enabled in the calendar view settings |
| Conflict | Reduced opacity with a red bar |
| Cancelled | Strikethrough—only visible when enabled in the calendar view settings |
Legend
Section titled “Legend”At the bottom of the calendar is the legend. It explains the colour coding in the time grid:
| Colour | Meaning |
|---|---|
| White | Bookable – the time slot is within opening hours and available. |
| Red | Outside opening hours – the resource is not regularly available at this time. |
| Blue | Block periods – the resource is blocked (e.g. holidays, public holidays, special events). |